

How Do You Get Moisture Out of a Headlight?
If you've ever been driving down the road and noticed moisture inside your headlight, you're not alone. This is a common issue, but what causes it, and what should you do about it? This article will provide an in-depth look at the causes of moisture in headlights and how to get it out.
What Causes Moisture to Get in a Headlight?
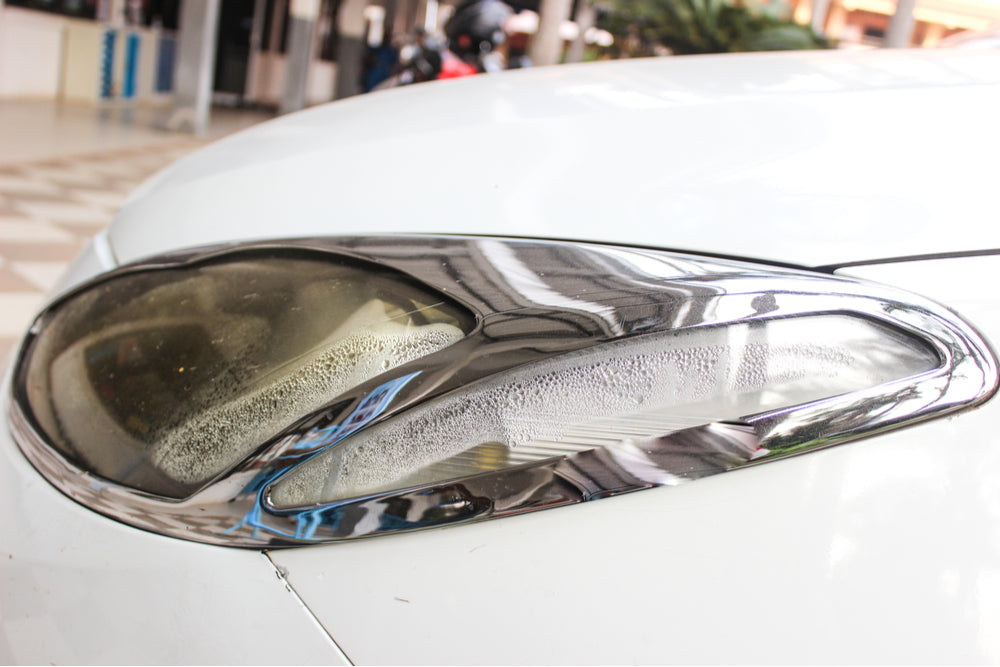
Several factors can cause moisture to get into a headlight. The most common culprit is water ingress - when water gets into the headlight assembly through cracks or other openings. Other causes of moisture include condensation and damage to the headlight seal.
One common source of water ingress is a leaking headlight seal. When water gets into the headlight assembly, it has to go somewhere. Often it will drip down and get trapped in the headlight vent, which sits just below the lens of the headlight.
This happens because there's a gap beneath each screw on a plastic headlight assembly that allows for a small amount of leakage. Underneath, there is a rubber o-ring that provides an airtight seal when all screws are properly tightened.
However, after years of exposure to high temperatures inside the engine bay and harsh elements from outside, this o-ring becomes brittle and ineffective at sealing out moisture.
Sometimes debris enters through this gap, trapping even more water near the lens area above the opening. Any pooling water can freeze in sub-freezing temperatures, weakening the headlight assembly even more.
Headlights also have a small vent hole at the base of the housing that allows air to flow into and out of the unit to prevent moisture build-up. If this vent becomes clogged, moisture might take longer to evaporate, causing water to become trapped inside for more extended periods.
Also, if debris gets stuck in this vent area near the bumper or undercarriage, it could impede proper airflow and cause condensation on its own
Condensation headlights are sealed units designed with specific tolerances to keep moisture out while still allowing air to circulate through each component. When these components are exposed to a significant temperature difference, condensation will occur.
This is very common in the wintertime when people have their car parked outside for hours and bring it back inside to a warm garage. Water can condense on many different interior surfaces, including headlights, from cold temperatures outside to warmer temperatures inside.
You may also notice moisture collecting on other areas of your vehicle to indicate that you have this problem. For example, if moisture accumulates around the rearview mirror against the windshield during colder months, there might be a hole somewhere in the headlight unit that's allowing moist air into the assembly.
When is Moisture in Headlights Bad?

So, how moisture affects your headlight? As we discussed earlier, having water in a headlight in and of itself is not bad, but it can cause issues when left unattended. Water is conductive, and when present inside the lens area of a headlight, it could cause short circuits or corrosion that will diminish the output of your headlights over time.
How Do I Get Moisture Out of Headlights?
Let's go through each potential source for moisture getting into the headlight assembly one by one to find out how to eliminate this problem.
It's worth noting upfront that you don't have to fix every single issue at once - work your way down the list until you've addressed all possible causes for water entering your housing. This will minimize the time required before you see an improvement in your headlights' output.
- If moisture is present inside the headlight, remove it using whatever method you're comfortable with. If the assembly has not been disassembled before, it's likely easiest to use compressed air to blow out any water that remains after wiping down the lens with a soft cloth or squeegee.
When working on plastic lights (Pry off light cover for access), be sure not to pry against the lens itself; instead, pop open the housing near edges where there is more room for leverage and less likelihood of damage. Do not use pressurized air without having an appropriate nozzle on hand because this can cause permanent damage to lenses if improperly used!
After taking care of any visible moisture around seals, place clean rags or paper towels near the seals for a day to absorb any humidity from within the headlight unit.
- Vents clogged with debris should be cleared out by hand if possible. If a vent is completely blocked, it may be easiest to remove the headlight assembly and place it on a table under bright light so you can see inside better.
If this is not an option, using compressed air to blow out anything stuck inside your vents is fine as long as you keep airflow moving through each component, aiming primarily at where components meet one another to knock loose anything stuck in between.
After blowing everything out from all angles, wipe down the headlight assembly with a soft cloth or squeegee before placing back where you got it from.
- A headlight seal is a rubber membrane designed to keep moisture from your headlight assembly. If this component has a tear or hole in it, you will need to replace the seal using adhesive and the instructions specific to your vehicle's make and model.
You can also use clear two-piece silicone caulk for smaller holes without having to disassemble anything if you're able to push the water back far enough after wiping with a cloth or squeegee.
Use caution when applying new sealant since some materials can stain plastic on contact while others dry overtime at an uneven rate which could lead to bubbling later on down the road! For this reason, we recommend using adhesive and proper replacement parts where possible unless you know what you're doing.
- If damage to the headlight assembly has let moisture inside, you need to decide whether or not you want to repair it yourself or take your car in for service.
This is a good time for professional help, even if you know how to fix things because high-powered lights such as HID and LED require special tools and expertise that most shops will have on hand already.
If fixing yourself sounds like something worth pursuing - make sure you follow all safety instructions provided by professionals! And remember that although replacing a headlight assembly may seem expensive at first glance, you're likely to save money in the long term by doing it yourself.
Conclusion
There are multiple ways to get the moisture out of headlights. Start by addressing visible moisture and then deal with other causes of water entry. If you're not comfortable with any of the methods described, take your car in for professional service.
Always use caution when working with electrical components, and read all safety instructions beforehand!
Check our online selection of headlights and call us if you have any pre-sales questions.